Pages

Friday, June 22, 2012

Sleeveless Tova Dress (for moi!)

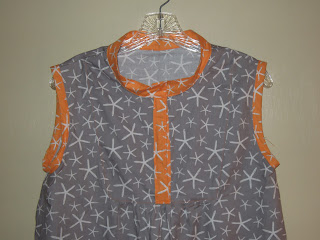
When I first decided it was time to sew something for myself, I did some serious interwebs research through my new favorite search engine:  Pinterest!  The pattern that kept popping up and catching my eye was the Tova!  I saw so many variations... like this one, and this one, and this one.  The price of the pattern deterred me at first, but I finally bought the PDF, and since I've already made one and cut a second, I think I'll get my money's worth!  While the variations are many, I finally decided that for my first Tova, I'd go sleeveless (allowing me to wear it right away!) and in a knee length dress length.  My fave summer outfit is a dress with leggins and sandals, so why not add some variety to my go-to outfit? 

The fabric is something I ordered a month or so ago, when I had just decided to make something for myself, but realized I had very little "grown up" fabric!  It's from Michael Miller's "Going Coastal" collection - sea stars in grey and orange.  I usually don't go for grey, or any neutrals for that matter, but this one appeals to me, and the orange coordinating fabric sets it off with just enough pop of color.  Also, it looks good with black leggings and orange sandals... both of which are already in my possession.


In some of the pictures, it looks like a real sack of a dress.  I was pretty nervous sewing it up that I was, indeed, sewing myself a very pretty sack.  But in the end, even my husband thought it was a really cute dress!  He's always the first to offer "constructive criticism" when it somes to my sewing and craft projects, so when the forst words out of his mouth are a compliment, I take it as a really good sign!!  I did end up taking it in a bit under the arms (this one is a medium, to compensate for my not so skinny hips and thighs), because while I am wide in the hip area, I do not have that same issue in the chest area! 

Other than that, I made 3 additional changes to the pattern.  The first, and most obvious - sleeveless!!  My original plan was to make the sleeves as in the pattern, but I also really wanted to wear the dress sometime soon!  And, uh, the print, being starfish and all, is a bit on the summery side to be long sleeved and intended for the fall.  To make it sleeveless, I simply made bias tape from the orange fabric and bound the unfinished armholes with it.  Incredibly easy, actually. 

Sleeveless!!

The second change, more for decoration than anything else, was to add vents at the bottom.  I didn't wan it to be tight at all around my knees.  I move and bend A LOT during the day to keep up with my kids, and having a dress that makes that difficult means that I just will not wear the dress, and that's a shame!  Additionally, I was looking for another place to add in some of the orange starfish.  It's extra from the bias tape I made to go around the sleeves, and took about 5 minutes to add on!


Third, and finally - I added a strip of the orange starfish to the insides of the front bodice where it opens.  I did this for a few reasons:  One, because it added more orange.  Two, because I think it looks more finished than seeing the underside of the grey printed fabric when the front is open (and when wearing, it usually IS open).  And third - when I sewed the edging onto the front and top-stitched, my machine did something wacky and made all kinds of extra loops in the underneath stitching.  This covers it, and allows me the opportunity to not seam rip to death the front of my otherwise lovely dress!


I like these changes, and think they made the dress much more wearable for ME.  Next time, I'm going to alter the collar - halving the width and rounding the corners, a-la this post.  (FYI, that link also takes you to an extremely helpful Tova sew-along.  Some awesome tricks and tips!)

(My collar, two ways)

closed, pulled straight, plackets lined up:


loose and open, and the way I'll likely be wearing it:


Also, I love me a dress with pockets.  I think the Tova dress could absolutely work with pockets... either slash pockets here:


or front patch pockets here:


You agree, yes?  Sometimes a Momma just needs a place to keep bandaids, cell phone, and a couple dollars from the iced coffee fund without lugging around a 25 pound diaper bag!  Obvi, the pockets would not be purple, or would at least be the same color purple... and would be appropriate sizes and all that :).

Here are some of my favorite details, in picture form:

(starting from large picture, then going clockwise)
1.  Bottom of front placket (placket!  that's the word I've been searching for this whole post!!)  Shows the orange stitching well, and the front pleat detail.
2.  Left sleeve, bound with handmade bias tape
3.  Inside front placket, lined with orange fabric
4.  Front placket
5.  Right sleeve
6.  Dress hem, two lines of orange contrast stitching

This was a pretty quick sew, despite my worries that it would be exactly the opposite with that front inset piece.  Omitting the sleeves, probably helped with that, but making the bias tape added time back on... so I'm probably pretty accurately even on time there.  I'm looking forward to making a bunch of these tops in different lengths and with different sleeve types.  The cut and fall of this shirt are absolutely my style, and I can see myself making loads of these.  If you make your own clothes, have thought about it, or like to have other people make clothes for you (my sister is guilty of this one!), then the Tova pattern should be in your home, and well loved.  Versatile, easy to wear, flattering.  Good things. 

I've already worn this one mutliple times... and I was actually frantically hand sewing my lining on the placket the morning of the first time I wore it!  I just couldn't wait to put it on.  And some day, really, I'll get my act together enough to actually iron a piece of clothing before I photograph it and blog about it!  :)  I'm probably embarrassing my mother with all of these rumpled pictures.

rumpled hem!

rumpled collar!
If you're on Pinterest (and if you aren't, why aren't you?!), type "Tova" into the search box and you'll get all kinds of results.  So many ideas for fabric choices and alterations.  Can't wait to see what my next one looks like!

finished Tova, and my mom's door :)  hooray!

sewing inspiration from the barbie box...

We're visiting my mom this week, which means 3 things:

1.  beach days!
2.  outside showers!
3.  raina playing with the same barbies my sister and i used to play with!

(okay, it actually means way more than that, but those are 3 highlights!)

I love digging through our big old trunk of barbies, barbie clothes, and barbie furniture with her.  There are some major flashbacks, and some awesome reminders of what fashion was like in the late 80's and early 90's!!  I found two pairs of pans in the chaos that I immediately scooped out for further inspection.  I have no idea who these pants belonged to.  They're on the smaller side, so they can't be Barbie's... maybe Skipper?  Doesn't matter much now, but I love them!  And now I want to make them in real life baby/toddler size.  (I think by the time I'm able to actually make all of the clothes I want to make for Raina and Lucca, they'll be too big for them!)

Here they are... front of left pair, back of right pair:


 back of left, front of right:


and some close ups:


I want the fabric, details, all of it.  I'll let you know how it goes :)

Thursday, June 21, 2012

Butterflies and Raccoons

We grew butterflies!  (Grew?  Raised?)


We got this kit, and followed instructions:  Insect Lore - live bug kits!

It was pretty awesome at first.  I did this when I was younger, and have always loved butterflies, so it seemed like a no brainer to do this with Miss Raina this summer. Go online and order the caterpillars, easy peasy.  They arrived a few days later in the mail, cute and little and fuzzy wuzzy!


In no time at all, though.... they were eating through their brown food stuff, getting rid of waste, and getting big and meaty.  They yucked me out in a way I didn't remember getting yucked out when I was younger!


Raina checked them every day... she was so anxious for the caterpillars to turn from babies to "grownups" and build their "raccoons!"  We did lots of talking about the life cycle of a caterpillar/butterfly.  We read the book that came with the kit, read some things online, and of course read "The Very Hungry Caterpillar" a few hundred times :).

A week and a half later, the raccoons came!  Slowly, one by one... the caterpillars built their raccoons on the lid of their little cup-bitat, and when they were all in... we moved them to their new and spacious butterfly screened in condo!

Then more waiting.  And some drama.  (With no pictures.  No pictures of sad butterfly drama)

I woke up one morning to find 2.5 of 5 butterflies out of their cocoons!  Hurrah!  By the end of the day, the count was the same - 2.5.  Ugh.  Next morning... 4.5 butterflies out.  And the half butterfly was flapping his wings furiously and frantically, causing the place to shake, and making a noise that freaked.  me.  out.  A day later, it was clear (to me, at least,  I don;t think Raina ever got it) that we had only 4 butterflies, and one sad cocoon mishap.  I am still pretty traumatized by it, and the sound of the flapping.


After 2 days of admiring our beautiful painted ladies indoors, we decided it was time to set them free!  Outside we went, opened the butterfly condo... nada.  Looks like the butterflies liked their condo... furnished with leaves, flowers, and tiny sugar water drinks.  I cut the whole lid of the condo, and they ventured out one at a time.


Raina's reaction was exactly what I hope for as she watched them fly out into the sunny day.  So amazing, that I couldn't stop watching it for long enough to take a picture.  You understand, right?  Those moments are gone so fast, I had to capture it in my memory instead of through a lens for once!


Will we do it again?  I'm undecided.  Part of me wants to give it another go and watch next years caterpillar larvae miraculously become brilliant orange butterflies.  Part of me can't go through the flapping again.

Wednesday, June 20, 2012

Eat Yo' Produce!

Sometimes it's hard to make a toddler eat.  It's hard to make them eat, period.  It's even harder to convince them to eat things that come from the ground or grow on trees.  I've found that having fun with it can make things so much more appealing!  So I introduce you to....

PRODUCE MAN!


His cucumber hair, his red pepper smile, his edamame eyes and carrot eyebrows.. irresistible!

(healthy dip tip:  one tub Chiobani plain greek yogurt, 1/4 cup low fat sour cream, one package onion soup mix.  Yummy and pretty low cal/low fat!)

And this fruit rainbow, while completely unoriginal (if you've been on Pinterest in the last, well, EVER, you've seen it 100 times), had to make an appearance in my house.  

(and in case you need some dip to make it more appealing and less healthy - mix one package of cream cheese with on tub of marshmallow fluff.  While it completely negates the fact that you are eating fruit, it is SO good!)


What tricks do you use to help convince the little people (or big people!!) to eat more healthy food?

Tuesday, June 19, 2012

Girl's Got Style

I've been thinking about doing this post for a while now, but was totally inspired to get my butt in gear when I read this post earlier in the week on Ruffles and Stuff  (which has been one of my favorite blogs for a long time).

I let my kid dress herself.

And I love it.

Raina wakes up in the morning, gets out of her pj's, and gets herself dressed.  She saves the ties, back buttons, and bows for a grown up, but for the most part, she is dressed, head to toe, all by her 3 year old self.  Her uninhibited, imaginative, confident and happy 3 year old self.  Also, no lie, I love that it's a time saver for us most mornings!  One less body to get dressed, because by the time she knocks on her door from the inside and yells, "Mummaaaaaaaaaaaa Daddyyyyyyyyyyy, come out come out wherever you are!" ...she just needs breakfast and shoes!  Awesome!

Even when she was too young to really be dressing herself, Raina still had a unique sense of style:


1.  Fine, we could tell her she had to wear the rockin' guitar jammies, but she'd be darned if she wasn't going to accessorize with pink sunglasses and a puffy purple purse!
2. (and 5)  She strongly believed that a skirt was not a skirt unless it was pulled up to the armpits!
3.  When in doubt, go without.  All you really need is animal crocs and a fleece scarf if you don't have anywhere to go!
4.  At about 20 months, she picked out this one all by herself.  Orange under layer of tshirt and tights, awesome socks, hand knit pink sweater.
5. see 3
6.  Fashion kitty!  Always accessorize your hipster jeans and high tops with an earflap hat!  And you better believe she could strike a pose!

When I was a preschool teacher, I LOVED watching the girls who picked their own clothes come in every day.  All florals, head to toe;  skirts layered with leggings and turtlenecks;  tights with rainboots and party dresses... When possible, I even used it as inspiration for my own dressing!  When you're working with 3 year olds all day, you can get away with certain things :)  So when Raina started showing interest in picking her win outfits, I went with it.  And when she showed she had the ability to not only pick the outfits, but put them on as well... I decided to let go and let her do her thing....

I LIKE giving her choices, almost to a fault.  (I wont get into detail here, but it goes beyond clothing, and I'm sure it annoys people sometimes...)  And with clothes, what does it matter, really?  She doesn't get to choose whether or not she sits in a carseat, or whether I cancel a playdate because the car needs to go in to the shop.  But she can choose her outfit.  She can be creative, imaginative, and in control of a piece of her world.  I like that.  It also gives her the opportunity to practice zippers, buttons, snaps, buckles... all important skills to master.
1.  THank you, Gwen Stefani and Target.  Harajuku Mini made my year.
2.  "Hey guys!  I'm just at the mall in my rainbow pants!  Can you meet me by the elevaators?"
3.  Her purple boots!   Raina was very specific when we went to the shoe store that purple boots were her NEED to have item for the fall. 
4.  Why limit yourself???
5.  Cat face boots.  I secretly wish they came in my size.
6.  CHiPS?  Diego?  Super zoo patrol Raina to the rescue!
7.  Her go-to gardening outfit... ballerina panda chic.  The mailman loves this one
8.  3rd birthday attire - tutu, party shoes, pj princess shirt, and neon hair clips
9.  Queen of layering and mixing patterns
10.  Ice cream dress, purple boots, hoodie... and, obvi, purple hairnet!
11.  "It's RED day!"  (and red day wouldn't be complete without her glitter shoes!)
12.  Rockin' her toddler hippie chick style at the Wake Up the Earth festival - rain boots, rainbow patchwork dress, rainbowsaurus rex hoodie.
1.  Mis matched sicks is her new signature look.  Makes laundry folding exciting, since I never know if socks are missing :) 
2.  What?  You didn;t get the memo?!  Knee pads are so in this summer!
3.  Two bathing suits, SO much more comfy than just one!
4.  White dress, pink pants, fancy bows in the hair... if you guessed we were headed to a FARM, you guessed right!
5.  Just the right outfit for a hike in the woods!
6.  Leggings under romper, pushed up to knee level... converse and mismatched socks... awesome hairpoof by mom, toddler approved. 
7.  Looking awesome for a stroll through town... sunglasses. panda pants, glitter shoes, flowered dress... check!
8.  Bumblebee cowgirl!  Clothes found at Yaya's... and had to be peeled off for bathtime under extreme duress!
9.   Both top and bottom have hearts on them, so they must match... right?
10.  Purple boots at the farm.  These boots go everywhere!
11.  "POOF!  You're a goon!"  ...or a master at layers!
12.  ...but honestly, how could her fashion sense stand a chance when mommy dresses baby sister like THIS on purpose?!?!  :)

I have only claimed veto power a few times - my grandmother's funeral, and a few times for church and family holiday parties.  Other than that, it's a runway every day! 

Thursday, June 14, 2012

Baby Clothes Quilt: Making progress!

I'm making progress, pinky swear!  It's been a much slower-going project than I anticipated.  Probably for a number of reasons... here are a few of them, in no particular order:

1.  I'm finding that some things are hard to actually cut.  I could cut up onesies and pj's all day long, but those stinkin cute little dresses?  Rough.
2.  I like to work on other things, too!
3.  When I decide something is officially outgrown (which I hate to do!  and usually, things stay in the drawer a bit longer than they actually should...), it gets tossed into a bin in the closet in our master bedroom.  Lucca goes to bed at 7:30.  So anything I haven't brought downstairs early in the day is off limits for evening working-on.  Boo.
4.  I'm trying to be detail-oriented in the cutting, making sure to save the trims, patches, pockets, and other cute details.  This adds minutes to the cutting.
5.  Oh yeah, I have 2 kids to take care of and dinner and laundry and all that other housefrau stuff.

Just a peek at my work as of late:

dresses!  so hard to cut into these pretty little layers!

stack one!

stack 2!

feet! 

not sure how I'm going to incorporate these into the quilt... but just look at this face!  how could i NOT let him join the quilt party?!

I'm sure there has to be a point where I just have to start laying things out and sewing rows together.  It seems like I could let this go on forevs, since both girls will continue to keep outgrowing their clothes!!  I have to start somewhere, though... and maybe it would be nice for the set-up of the quilt squares to be sort of chronological!  I hadn't thought of that until I typed it, to be honest.  Like the rings on a tree.  Yeah, I'm getting really out there now.  But for really reals... the center would be the newborn, 3 months, 3-6 months clothes, and the squares surrounding it would be 6-12-ish... and then for Raina there would be another section around it with some big kid pieces.  I like it!

My next post on this quilt will have real actual pictures of squares completed and sewn together into rows and/or blocks.  I wrote it down, and now it's a pact (between you and me, blog readers!  Hold me to it!)

My goal is to have these done in time for them to not include t-shirts with pictures of boy bands on them!  :)

Pants.


I have soooooo many sewing chores to do.  So many projects partially completed.  Blanket orders, dresses, yellow pants, 2 quilts...  it's bad.  My sewing table exploded.


However.... a certain 3 year old was rather insistent that my precious few minutes of daytime sewing should include new pants for her creep-o doll, Olivia.  I resisted, she persisted.  There were tears and there was whining.  I hate whining. (Despite it's almost perpetual existence in my house, or maybe due to it!)  I told her she could help sew!  I gave her some fabric, scissors, and free reign to create!  Still... she wanted PANTS!

So Olivia got some pants.


I used no pattern.  I held up 4 scraggly pieces of fabric, lined them up kinda sorta, and cut out a shape that looked like a pants pattern in a size I hoped would fit.  I didn't pin them, I just sewed.  I used bias tape that didn't match for the elastic waist, and orange thread because it was in the machine.  And a mermaid button.  They fit!  They are cuter than I expected.


Raina is thrilled.  And Olivia looks much warmer.  The pants don't do much to help her in the creep-o department, though...


Now it's almost 10 pm.  I've made doll pants.  I've blogged about doll pants.  Maybe I should try to put a dent in that sewing mess now? 

Wednesday, June 13, 2012

Strawberry Pickin' Summer Blouse

I made another top for myself!  I used the Summer Blouse pattern again, only this time I lost the sleeves.  I really thought that challenging myself to sew things for my own wardrobe would be a struggle, since I love sewing for kids so much.  Turns out I love sewing for myself!  Now I need to opposite-challenge myself to start sewing kids clothes again!  :)  Or maybe I should challenge myself to work harder on my baby clothes quilts!!

Here's the front:


And here's the back!


This top is the much anticipated (ha!  By me anyway...) companion piece to Raina and Lucca's Gigi dresses - made from my sweet grandmother's old aprons.  Once again, I stuck to the pattern as much as possible, but basically just cut iff the bottom of the apron and used that as the bottom piece to keep pockets, buttons, and trims intact.


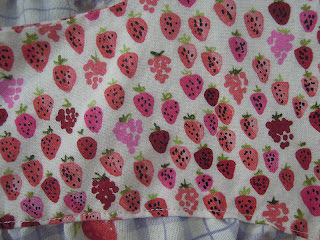
From the beginning, I knew that I'd use this strawberry print apron to make something for myself.  I love it - print, softness, color, everything about it.  I knew I needed to use a fun pattern to coordinate with it for the bodice top, and as soon as I saw this strawberry print I fell in love.  

It's strawberries and raspberries in pinks and reds, and has kind of hand-printed look to it. 


I was concerned for just a second or two that it was TOO MUCH STRAWBERRY.  It didn't last long, and I'm glad I didn't let the little voices sway me.  Love.


No buttons on this one, and no poofy sleeves.  Simple summer tank, perfect for picking strawberries.  Which I plan on doing with my lovely little ladies as soon as the stinkin' rain stops!!