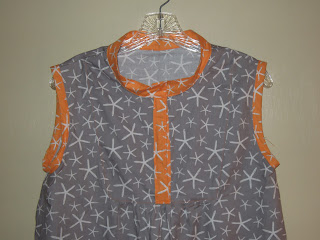
The fabric is something I ordered a month or so ago, when I had just decided to make something for myself, but realized I had very little "grown up" fabric! It's from Michael Miller's "Going Coastal" collection - sea stars in grey and orange. I usually don't go for grey, or any neutrals for that matter, but this one appeals to me, and the orange coordinating fabric sets it off with just enough pop of color. Also, it looks good with black leggings and orange sandals... both of which are already in my possession.
In some of the pictures, it looks like a real sack of a dress. I was pretty nervous sewing it up that I was, indeed, sewing myself a very pretty sack. But in the end, even my husband thought it was a really cute dress! He's always the first to offer "constructive criticism" when it somes to my sewing and craft projects, so when the forst words out of his mouth are a compliment, I take it as a really good sign!! I did end up taking it in a bit under the arms (this one is a medium, to compensate for my not so skinny hips and thighs), because while I am wide in the hip area, I do not have that same issue in the chest area!
Other than that, I made 3 additional changes to the pattern. The first, and most obvious - sleeveless!! My original plan was to make the sleeves as in the pattern, but I also really wanted to wear the dress sometime soon! And, uh, the print, being starfish and all, is a bit on the summery side to be long sleeved and intended for the fall. To make it sleeveless, I simply made bias tape from the orange fabric and bound the unfinished armholes with it. Incredibly easy, actually.
 |
| Sleeveless!! |
The second change, more for decoration than anything else, was to add vents at the bottom. I didn't wan it to be tight at all around my knees. I move and bend A LOT during the day to keep up with my kids, and having a dress that makes that difficult means that I just will not wear the dress, and that's a shame! Additionally, I was looking for another place to add in some of the orange starfish. It's extra from the bias tape I made to go around the sleeves, and took about 5 minutes to add on!
Third, and finally - I added a strip of the orange starfish to the insides of the front bodice where it opens. I did this for a few reasons: One, because it added more orange. Two, because I think it looks more finished than seeing the underside of the grey printed fabric when the front is open (and when wearing, it usually IS open). And third - when I sewed the edging onto the front and top-stitched, my machine did something wacky and made all kinds of extra loops in the underneath stitching. This covers it, and allows me the opportunity to not seam rip to death the front of my otherwise lovely dress!
I like these changes, and think they made the dress much more wearable for ME. Next time, I'm going to alter the collar - halving the width and rounding the corners, a-la this post. (FYI, that link also takes you to an extremely helpful Tova sew-along. Some awesome tricks and tips!)
(My collar, two ways)
closed, pulled straight, plackets lined up:
loose and open, and the way I'll likely be wearing it:
Also, I love me a dress with pockets. I think the Tova dress could absolutely work with pockets... either slash pockets here:
or front patch pockets here:
You agree, yes? Sometimes a Momma just needs a place to keep bandaids, cell phone, and a couple dollars from the iced coffee fund without lugging around a 25 pound diaper bag! Obvi, the pockets would not be purple, or would at least be the same color purple... and would be appropriate sizes and all that :).
Here are some of my favorite details, in picture form:
(starting from large picture, then going clockwise)
1. Bottom of front placket (placket! that's the word I've been searching for this whole post!!) Shows the orange stitching well, and the front pleat detail.
2. Left sleeve, bound with handmade bias tape
3. Inside front placket, lined with orange fabric
4. Front placket
5. Right sleeve
6. Dress hem, two lines of orange contrast stitching
This was a pretty quick sew, despite my worries that it would be exactly the opposite with that front inset piece. Omitting the sleeves, probably helped with that, but making the bias tape added time back on... so I'm probably pretty accurately even on time there. I'm looking forward to making a bunch of these tops in different lengths and with different sleeve types. The cut and fall of this shirt are absolutely my style, and I can see myself making loads of these. If you make your own clothes, have thought about it, or like to have other people make clothes for you (my sister is guilty of this one!), then the Tova pattern should be in your home, and well loved. Versatile, easy to wear, flattering. Good things.
I've already worn this one mutliple times... and I was actually frantically hand sewing my lining on the placket the morning of the first time I wore it! I just couldn't wait to put it on. And some day, really, I'll get my act together enough to actually iron a piece of clothing before I photograph it and blog about it! :) I'm probably embarrassing my mother with all of these rumpled pictures.
 |
| rumpled hem! |
 |
| rumpled collar! |
finished Tova, and my mom's door :) hooray!


Love the two colors together!
ReplyDelete