Pages

Showing posts with label cooking. Show all posts

Wednesday, June 20, 2012

Eat Yo' Produce!

Sometimes it's hard to make a toddler eat.  It's hard to make them eat, period.  It's even harder to convince them to eat things that come from the ground or grow on trees.  I've found that having fun with it can make things so much more appealing!  So I introduce you to....

PRODUCE MAN!


His cucumber hair, his red pepper smile, his edamame eyes and carrot eyebrows.. irresistible!

(healthy dip tip:  one tub Chiobani plain greek yogurt, 1/4 cup low fat sour cream, one package onion soup mix.  Yummy and pretty low cal/low fat!)

And this fruit rainbow, while completely unoriginal (if you've been on Pinterest in the last, well, EVER, you've seen it 100 times), had to make an appearance in my house.  

(and in case you need some dip to make it more appealing and less healthy - mix one package of cream cheese with on tub of marshmallow fluff.  While it completely negates the fact that you are eating fruit, it is SO good!)


What tricks do you use to help convince the little people (or big people!!) to eat more healthy food?

Monday, April 2, 2012

Peeps S'mores - an almost-Easter treat!


6 Steps to afternoon happiness!

1.  Gather your grahams, your chocolates, your peeps.  (We chose purple bunnies.  We always choose purple here!)

2.  Assemble

3.  Microwave.  Be careful not to let your peep EXPLODE!  (It happens!)

4.  Squish.

5.  Delish.  Eat it up.  Lick your fingers.  Scrape chocolate off the plate.

6.  Repeat.  

(Toddler tip:  Heighten the experience by watching your favorite "kid show" on Netflix while you devour your gooey tastiness!)


Friday, March 9, 2012

Cheaters Chicken Pie

My mom's chicken pie is one of my most favorite foods.  It's one of my most favorite smells.  It's on my top 5 list of things to cook for dinner when nothing else sounds yummy.  But sometimes, the prep sounds like too much.  Sooo much chopping, so little naptime.  Even when you use one of these.


On days when I feel like I want the reward without the work, I make cheaters chicken pie.  All the yum, half the time!


You'll need precooked chicken strips, premade pie crusts, and frozen veggies of your choice for the filling.  Roll one pie crust into the bottom of a pie plate, pour in the chicken, top with the veggies.  I like lots of bits in my pie, so I fill it up pretty high.

Now you need some sauce.  It's not scary, I promise.  I keep the recipe on my fridge, in the top corner of the calendar.  That way I never have to look in a box.  My favorite sauce, in plain sight.


Melt the butter, then add in the flour.  When it's melted together all pretty-like, add in the milk and broth. Season to your liking.  This is my favorite combo:

Wait, you don't know what maple pepper is?  Get some here.  Maple Pepper  It's good on everything.

Stir til it thickens.  You will feel a noticeable difference in the sauce consistency.  Yes, you will.  Pour this mixture over the pie filling, up til the tippity top.

Open up the second crust and fold it in half to cut vents.  You can do traditional slits if you want.  We almost always do hearts, although we've been known to do a skull and crossbones every now and ten to shake things up!  Vents are important.  Mine look pretty messy on this pie.  Sorry.  I probably should have slept at naptime instead of making a pie :)  Place this pie crust on top of the pie and press all the edges together to make sure there are no leaks.  I like to use one of these to make the edges look pretty!  (It's a wavy slicer for veggies)  Brush the top with milk or a beaten egg - it will look so much prettier when you're done!  Use the milk/egg to attach the cut out vent shapes, if you want.


Cook for 20 minutes at 425, then lower temp to 350 and cook for another 30 minutes.  (This is all uncovered BTW.  No foil, please.  I promise the crust will not burn, and you want it to get nice and browned and flaky.


EAT.  I like mine with a side of cranberry sauce, but I'm the only one in this house who thinks that is a good idea.  Oh well.  This pie lasts us a short 2 days.  Dinner, lunch, dinner, the end.  It's that good.

Wednesday, February 29, 2012

Thumbprint Cookies: Today's Cooking Adventure!

I love that Raina's apron gets so much use!  Cooking and baking are some of the best times we spend together during the day.  I love that it's something fun we can do together, something she can really participate in and get her hands dirty, something that might teach her a little about math and science without being pushy, and mostly... something that results in a yummy treat!  Well, usually yummy.

Today we made thumbprint cookies.


I remember making thumbprint cookies fairly often when I was younger... in the kitchen with my mom, jam and jelly jars in assorted flavors lined up on the counter, thumbs cleaned and ready for some action.  Today we kept it simple with two flavors... but we mixed things up a little.  Yes, there was jam.  Strawberry Jam, fresh from Nana's kitchen - delish!  But then.  THEN.  We made some with Nutella.  Yes, it is as amazing as it sounds!

Here's what you need:

  • 1 stick softened butter
  • 1/2 cup powdered sugar
  • 1/4 tsp salt
  • 1 tsp vanilla extract
  • 1 1/4 cups flour
  • 1/4 cup granulated white sugar (for rolling)
  • Jam, any flavor and/or Nutella
Here's What You Do:

1.  Preheat the oven to 350 degrees and grease a baking sheet.
2.  In a medium bowl, mix together the butter, sugar, salt, and vanilla. 
3.  Add in the flour. 
4.  Roll the dough into 1″ balls and then roll them in granulated sugar.   Raina's favorite step!  Rolling the balls around in the sugar and then licking her fingers got this step an A++ in her book!
5.  Place on the baking sheets.  Bake 10 minutes, and then remove from the oven.
6.  Make an indentation in the middle of each cookie with your thumb.  Remember, the cookies just came out of the oven!  They are hot!  So stick your thumb in them, but be careful.  And probably don't let your kids do this part, mmkay?
7.  Return the cookies to the oven and bake about 8 minutes longer before removing to a wire rack to cool.
8.  Once cooled, fill the cookies with your favorite jam.  For the jam, it was ready to go.  The Nutella I microwaved for 15 seconds to make it easier to spoon into the cookies.
9.  Return cookies to oven and bake for 3-4 minutes - just long enough to let the fillings melt a little and get nice and gooey!

10.  Let cool, then devour. 
Best served with chocolate milk in fancy teacups!


Friday, February 17, 2012

Kale, mushroom, and sausage stew.


Inspired by the kale, as my dinners often are :)  I wasn't sure what to call this.  Soup?  Stew?  Stuff in a pan?  It's pretty particle heavy, though, and contains meat, so stew.  Went with stew.

Ingredients:


*2 cartons of chicken broth (I actually have no idea what the size is and I forgot to write it down, but they are the standard size cartons.)
*Half a medium white onion, chopped
*One bunch of scallions, chopped
*One package of baby bella mushrooms, tops chopped in half
*Generous handful of baby carrots, chopped (carrots almost didn't make the cut, but I'm glad they did.  Plus, it adds some color to an otherwise bland color palette!)
*One package (5) chicken apple sausages, chopped (You can use any sausage here, doesn't have to be chicken.  I just like them better.)
*Large bunch of kale, roughly chopped or torn (kale usually gets turned into kale chips immediately here, but this bunch was somehow left to wilt in the fridge for a few days, so it met a new and different fate!)
*4 garlic cloves, chopped
*Grain/rice of choice, if desired.  I ended up using barley, but forgot to put it in for the picture :)
*salt, pepper to taste

How to do it:

1.  Pour broth into large pan.
2.  Add all of your ingredients, except the grain.  Seriously, that's all I did,  I think it might be tasty to cook the onions and garlic first, but I'm trying not to use oil or butter while cooking so I didn't!  The kale might look like a lot at first, but it wil cook down so quickly.
3.  Cook on high heat until all ingredients have cooked down (about 15 minutes), then turn down to simmer and let your soup have a party.  I let mine simmer for about 4 hours.  It was soooo delicious, and our house smelled amazing.  I didn't even stir it that many times.
4.  About 20 minutes before you are ready to serve, add grain/rice, and re-cover.  You don't want it to get mushy in there, so adding it closer to the end helps it stay firm.  Sometimes I actually cook the rice or grains separately and add them when serving, but for this soup I really wanted the barley to soak up the flavors.
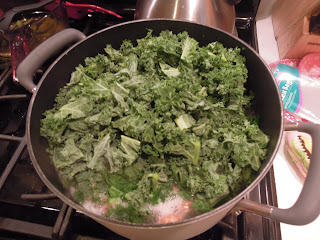
Kale, immediately after being added.  A giant pile of kale.  A few pictures down you can see what it looked like just a few minutes later.

Yum.  Thanks, Trader Joe's.But seriously, is there a good way to open a package of sausage?  I won't show you how I mauled this.

Carrots!

Carrots, with some perspective so you know how big of a pile it is.  About 10 baby carrots.  And yes, I cut carrots with that knife not meant for cutting carrots. 

Soup, cooking on high, about 4 minutes after adding kale.  The treat bags to the right have nothing to do with the soup.  I just need to clean up my counters after this busy week!

Don't the carrots make it look pretty?

With barley, about 4 hours later.


Served with heart shaped cornbread, it was SO good.  I love soup.  Have I said that before?


How did I get this done during naptime?  Because of this:

And more of that upstairs in Raina's room.  Yay naps!

And for your viewing pleasure, a cute bum.  Not many bums look that cute in pink velour leggings!