Sewing for Boys, for girls!
This pattern is from the book "Sewing for Boys' by Shelly Figueroa.... I ordered it because I saw the treasure pocket pants
here on Tara's blog and I fell in love with them. When I took a look at the book, I decided it was a pretty cute book that could just as well be for girls with a little fabric switch-up! So I ordered it, and my husband got really nervous when it came in the mail :)
"What's this?"
"A new pattern book I ordered!"
"Sewing for BOYS?"
"There's something I've been meaning to tell you..."
(silence)
"I'm KIDDING!!"
(nervous laughter)
oh, good times, good times!
Anywho... I traced the pattern on vellum, which I've never done before. It was awesome. You can see right through it to trace, but it holds up much better than tissue paper. Love it.
I made them in the smallest size the pattern comes in, 12-18 months. I don't know why. I don't know who I thought I was making these for. I have a 6 month old and a 3 year old. Yeah. I would have made them in 2/3 for Raina, but she only really likes jersey or fleece pants these days, and I was afraid she wouldn't wear them! So I made them as small as possible, and Lucca will be in them before I know it. Or maybe Raina will love them, and she can wear them as capris. Who knows.
First step, the pocket panel assembly. And I was already a tad confused. Luckily, I found this
Treasure Pocket Pants Sew Along on the trusty old interwebs and it saved me a lot of headache! Sadly, by that time the birds on the top part of the panel were already flying upside down, but we'll pretend they aren't.
Poofy pocket!
What the elastic casing looks like on the inside of the pocket:
So then you attach the completed pocket panels to the front pant pieces. Easy beans. Then you construct and sew the faux fly. And this is where the aformentioned sew along came in really handy. Without it, I'm pretty sure it would have taken me twice as long. With two little girls, I have never constructed a faux fly before... but I think my first one was a success! I was so proud of it.... I made my husband look at it way more closely than he really wanted to, but hey, I listen to him talk about video games, so it's only right! Right? Another note: You have to mark the stitching line for the fly on the top front of the pants... and the pattern says to do this in chalk. I usually use a good old fashioned fine tip orange crayola marker to do my markings, so I was initially stumped as to what I might use. I ended up using a piece of honest to goodness sidewalk chalk from Raina's basket of chalk. :)
Inside the flappy-do:
Next you attach the back panels and do some fancy top stitching to make it look all pretty. After the pockets and faux fly, this is cake.
And then you have a pair of very unfinished but very recognizable pants! Woohoo!
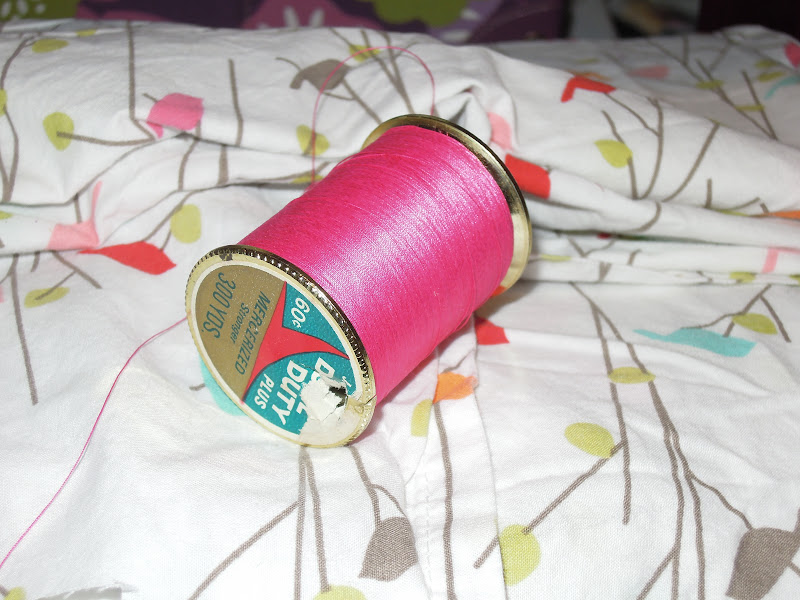
This is the hot pink thread I've been using on all of my projects this week:
I love the color, and that it came from my Grandma's sewing box, which I was incredibly blessed to inherit. I have no idea how old it is, but it cost $.60, so probably a couple decades at least. It's beautiful and silky, but when you use it to topstitch on white, things get tricky. My stitches got crooked a few times, and (to me at least) it's pretty obvious because of the color. Not that I'd change it, though!
And a little aside... does anyone else have one of these amazing bobbin winding devices? I bought it with a Christmas gift card and it is seriously one of the best sewing tools I've bought. Major time saver!
Back to the assembled pants...
I am in love with this bird sheet as clothing fabric!
Can you see my pink topstitching to the sides of the pocket panel?
p.s. - I did some of this during Raina's nap. Here's what Lucca did. Yum yum on some baby mum-mums. She loves to gnaw them into a pile of mushy rice goo!
Next up, you create the hem and waist facings and attach them. This is also where you thread elastic through the waist casing to make a for realz waist band that is so cute. And do more topstitching.
Again, the faux fly :)
The fabric is from two places...
the main part of the pants is this purple and pink print, recycled from a pair of Gap capris I could never throw away, but that haven't fit my mommy body in many moons.
And here is the queen sized pile of bird sheet. What else should I use it for?
When my husband first saw me cutting the fabric, he asked if the fabric was for one pair of pants. He's not big on the pattern mixing. :) I think it came out really cute, though!
One more thing. Here are three pairs of pants. The center, as you know, is the treasure pocket pants, size 12-18 months. On the left is a pair of Raina's capris from last summer - also size 12-18 months. On the right is a pair of Lucca's current pants, size 6-12 months (the waist is the same measurement as R's old capris!). Sizing is so arbitrary!
Can't wait tog et one or both of my girlies into these pants this summer!!