Pages

Wednesday, May 30, 2012

Reeses Peanut Butter Banana Bread


Do you think you gained 5 pounds just reading that title and looking at the picture?  Yeah, you probably did.  Let's not even talk about how much I've gained since making it this morning.  Hello, pants not fitting.  Diets and Pinterest just do not mix.

I made this from a recipe I've seen floating around Pinterest lately. (Ha!  I laughed out loud at the visual that gave me.  Go ahead, picture bread literally floating through Pinterest.  Funny.)  A friend also made it and put a picture on Facebook, sealing the deal.


Um, yeah.  Why has no one thought of this before?

I bought the mini Reeses Cups a few days ago and left them on the counter.  I knew this was a poor idea, but I got distracted by spit up or a naked toddler or something and forgot to hide them.  Yesterday hubs was making dinner (Shepard's Pie!  High five, hubby!) and I caught him sticking his hand in the bag.  "Hey, hands off!  Those are for a recipe!"  He removed his hand, but stole a few more on the way out.  

This lovely morning, Lucca decided we should get up at 5 AM.  She was wide awake, bushy tailed, full of pep, and ready to go to the beach.  Seemed like a good time to make this bread.  Lucca is already a great sous chef... she really enjoys getting her hands right into the cooking... especially the bag of brown sugar.  If you've never mixed up a recipe with a baby on your hip, it's a real adventure!  (i did, in case you were worried, put her down for all oven-related steps!)

Jason got up a little after 7, and through is groggy just woke up stupor, recognized his precious reeses.  He perked up, cut a slice, and deemed it yumma-licious.  Or maybe he just said it was really good.  Either way.  

Raina got up at 9:30 (awesome, and she SO needed it!), didn't want any part of it all day, but changed her mind at dinner time.  Good try, kiddo.  She had some for dessert and told me, "I really really like this one Mumma!"  Ah, those are the compliments I live for!

Just one more question... Can I frost it with Nutella?

Tuesday, May 29, 2012

Treasure Pockets for ME!


I'm really on a roll with this sewing for me thing!  This time, not only was I able to make something fun I can wear this summer... I also saved a pair of pants from the pile of doom in my closet known as "these used to fit me, and they're too pretty to get rid of."  It's a sad sad pile.

BUT... I had a lightbulb!  Raina's little treasure pocket pants are so cute (yep, they became Raina's... from the 12 month pattern size!).  And that bird fabric, LOVE.  So why not adapt it a little, and make it for me?

I started with pair of magenta-purple-ish linen pants from Old Navy.  The tag says they are a 2, and that little number is laughing at me.  I didn't cut it, but I wanted to.  It's nice to have it there though, reminding my 4 sizes larger self where my butt used to fit!  Babies.  They are so worth the bigger clothes.


So I cut them right up the outside leg seams, making one really funny looking pair of pant-things!  I tried them on like that for Raina, and I may have made her laugh harder than she does when Caillou's daddy gets pizza all over his face.  That's somethin'.

I took the side pocket panel pattern pieces (that's a mouthful!!) from Raina's pants, and made them longer. I used the same width and pocket size from the 12 month pattern, pinky swear!  I didn't need a SUPER wide panel, just wide enough to accommodate some leftover morning sickness-subsiding bagel baggage.  I sewed them together just like the pattern says, and then attached to to my wide open pants... just like the pattern says.

I made it really easy for myself and used the bottom edge of the sheet (that's what the bird fabric is from, if you haven't read the other couple posts where I've used it :)! )  No hemming, and easy to line up with the existing finished bottom of the pants.  I suppose if I hadn't been using a fabric with a finished edge, I would have pre-hemmed the pocket panel before sewing it to the pants.


They needed a little tweaking at the waist when I was done, since the width of the panels actually made them *TOO BIG*!  I love saying that.  I took them in a little, just curving my inside seams and then finishing them with a zig-zag stitch.


Purty!  Raina is pretty amused that we have matching pants now :)  I am, too, actually!  And I love that I got to use this bird fabric for something I can wear!  I'll try to get a decent picture of them on me to post, but I'm usually the one behind the camera, so we'll see how that goes.


I have a couple more pants awaiting this treatment right now... and I'm resisting the urge to match the panels to the tops I'm making.  I love the fabrics, but the matchy-matchy-ness of it creeps me out a little.

Monday, May 28, 2012

Pretty Summer Blouse


The newest chapter in the "sew something for myself!" series!  See, I told you I've actually been doing some sewing, not just writing tearjerkers.  :)

Honestly, though, I've been working on this one for quite a while.  It's an easy pattern, but I had so much going on, and it just kept getting hung over the back of my chair and then inevitably something would get hung over it and I'd forget for a few days.  Oh, did I mention it's also a FREE pattern?  THat comes in multiple sizes?  For really real!  You can download it here:  Pretty Blouse pattern  For free!

Did I mention it's free.

Okay, I'm over it now.

As I was sewing, it seemed like I was making a tent.  So.  Much.  Fabric!  I kept having to remind myself that yes, sewing mommy's clothes uses more fabric than sewing toddler and baby clothes, and it was going to be okay.  Even when I was almost done, I held it up and thought, "What the heck kind of a mumu is this?!  Why did I waste my pinwheels on this?!"

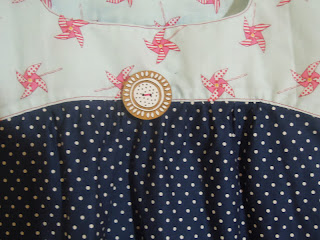
But in the end. I love it.  Even more so with the addition of the button.  It's wooden, with white paint.  I wish I could tell you it's vintage, or that I salvaged it from an amazing thrift store, but I bought it at JoAnn's.


At times I questioned the use of the pinwheels.  It's really a kids fabric.  I mean, the line is called "Children at Play."  But I love it so much!!  And I think the navy with white polka dots really works with it.  Not too busy, and the dots make it more grown up.  Or it's possible that since I spend pretty much all of my time around children, I am absorbing their dress code.  I can live with that.

so you can really see the pinwheels, and also the pretty neckline.


A few years ago, before Raina was born, I was with a group of church friends.  I had gone to join them straight from work as a preschool teacher, so I was dressed for the occasion, but I don't think my outfit was anything I would have thought twice about wearing on a non-work day actually.  One of them said to me, "I wish I had the courage to dress like you."

Uh... thanks?  I decided to take it as a compliment.  I felt confident and happy wearing a pink jersey dress over a button up shirt, with jeans and purple converse at the ripe old age of 27.  I still think back on that comment fondly, and try to dress in a way that people wish they had the courage to emulate.  (Not always easy with this post 2 baby bod, but I'll be back in top form some day...)  (And also, did I just use the word fondly?  Maybe I'm older than I thought!)

Any way, here's a few extra pictures...


I'm working on a second one already, minus the poof sleeves.  (Spoiler Alert!  It's a companion piece to Lucca and Raina's Gigi dresses!!) 

Tuesday, May 22, 2012

water bombs


We made these awesome sponge balls.  The intent was to use them for outdoor play, but our weather has been less than cooperative, so they became fun in the tub toys instead!

I could do a tutorial with pictures and a step by step, but the one in the original post is so pretty and clearly written, and the blog itself is so lovely... you should really just check it out there so you can make some of your own!

We made some big ones (mommies and daddies, of course!)


And some little ones (big sisters and little sisters!)


In addition to looking pretty darn cool and making a giant splash when tosed into the tub, these fun toys also serve the actual purpose of CLEANING when used in conjunction with a bar of soap :)


Our sponges were from the dollar store, and the floss we already had, so this ended up being a two dollar project that has more than paid for itself!  I love the color combinations in the original post, so I may even splurge on some sponges from Target when the weather figures itself out and we can use them outdoors with friends!

Monday, May 21, 2012

What I meant to say.


Some kids aren't lucky enough to know their grandparents.  Some know them, but never really get to *know* them.  I consider myself one of the lucky ones who not only knew their grandparents, but had a close relationship with them.  Last month, my grandmother passed away - rejoining my grandfather who had gone 3 years before.  This past month has been a tough one for me - coming to grips with the reality that my second home is no longer what it was, and that no new memories are going to be made.  

Needless to say, I haven't gotten much done in the way of crafting or sewing.  

This past weekend was my grandmother's memorial service, and it almost seemed unreal.  (My girls wore the dresses I made them from their Gigi's aprons.  Here's Raina's, and here's Lucca's.)  I had every intention of getting up to speak at the memorial, but my sister gave an act that was tough to follow, and before I knew it, the moment was gone.  This is what I meant to say, and what has been on my heart this month:

*     *     *

Most days it's hard to imagine I'm waking up in a world my Gram is no longer a physical part of.  That Snowport is empty.  But how quickly my tears become smiles. 

The British preacher Charles Spurgeon was quoted saying, "Carve your name on hearts, not on marble."  Is there anyone who has done that better than my Gram?  

I remember walking through the Red Maple Swamp with Gram and Pop, something we did fairly often when I was younger, but this particular time I was somewhere in middle school, only beginning to delve deeper into the meaning of love.  We were on a path through the swamp, and they were walking next to each other a few steps ahead of me.  And then they were holding hands.  And then Gram's head was resting against his arm.  It was an "aha!" moment for me.  "So THAT is what love looks like!"  

And then I noticed it everywhere.  Fixing the coffee for Pop before going to bed.  First the water, then the filter, then the coffee.  Cereal box, big bowl, big spoon.  A routine, done every night without much consideration on my part about how much it would be appreciated in the wee hours of the morning.  Until that moment.  (In a swamp, no less!)

Love is....

 ...sacrificing a beautiful bush in your side yard to 2 generations of nature soup cooks.
...gingerbread man and apple juice picnics at the beach.
...always having cold pinwheel cookies in the fridge.
...buying your own pencils back from your grandkids after they decorate them with stickers and call them souvenirs.
...shucking corn on the patio in humid August with a smile on your face.
...flicking the lights on the lamp post to say one last goodbye.

Gram's arms were full of love.  Whether I was 7 days old, on my first ride down to Dennisport in Gram's arms;  7 years old, joyously happy and bounding off the school bus;  17 and the saddest I had ever been;  or 27 and visiting "home" from 3,00 miles away. 

And really, shouldn't Grace and love go hand in hand?

It was that love, and that (G)grace, that helped make me who I am today.  During summer vacations, school breaks, weekend sleepovers.  It allowed me to be myself.  To explore and get dirty.  To glue shells to things or cut up magazines and glue the pictures into a who-knows-what.  That sometimes it's important to talk, and sometimes it's more important to just sit quietly together and watch the waves.  It taught me to appreciate nature, family, books, and good food.  It taught me the importance of a strong mind, a strong pair of hands, and a strong heart.  That life isn't always fair, but tomorrow always comes.  To love, and to be loved.  Gram taught me that.

And so, to my Gram, who was loved so much and gave it all right back, here's one last flick of the lamp post lights to you.  

Love you forever.

*     *     *

p.s. - I'll be back on track with my usual posts as soon as I can get my mind back around it (and my new sewing machine working correctly!  Happy Mother's Day to me!).  Until then, hope you don't mind the lack of humor and sewing puns.  :)  I've got some good things in store for you!


Saturday, May 12, 2012

Gigi Dresses Part 2: Lucca's Dress

(the pictures in this post are wacky.  my tall lamp broke, and pictures without my tall lamp friend mean bad lighting.  I tried to move into the bathroom, but things weren't much better in there.  pictures on model will come soon and will hopefully be in better lighting!)

Making these dresses has been an emotional process for me.  Taking her things, well worn, soft from washings upon washings, and making them into new little things for my own littles... it's given me time to think about her.  I'd sit at my sewing table, pinning, cutting, trimming, my fingers running along the bindings and over the buttons, and my mind would have a chance to wander and remember - something it doesn't get to do often enough in the hubbub of my everyday life.  I think she'd like these dresses.  (See Raina's dress here)


This one, for my chubby little 6 month old love, is made from the pink rose print apron.


I made it using the Goldie dress pattern... with adjustments of course, to account for the fact that my fabric was not a flat rectangle... but was instead an apron with snaps and pockets and a pretty finished edge.  

I had some snafus with this projects.  I don't know where I went wrong.  Obviously, my mind wandering got the better of me a few times, and this isn't a dress I'll be showing many people the inside of!  :)


I noticed at this stage in my sewing that a couple things had happened.  The bodice and skirt were well constructed, but sewn together wrong.  So I ended up with pockets in the back, and a seam down the front of the bodice.  Le sigh.  I did find a cute fix for the seam, and Lucca doesn't really need front pockets... so it I used it as a learning experience, but didn't spend any time with my seam ripper.


And for the first time, a HAMMER made an appearance at my sewing table!  Oh SNAP!  I've been favoring the button and loop lately, but for Miss Lucca, snaps seemed like a better choice... and it was fun to bust out the hammer.


THe snappage, however, did not go quite as planned.  Due to my previously mentioned inside out and backwards bodice, there were original snaps in my way when I went to attach the new snaps.  The yop ended up being slightly uneven, despite my best efforts to adjust things.  See the funny insides?  Extra crazy snaps.


When all was said and done, the finished dress was adorable.  I love the details on the outside, even if teh details on the inside are imperfect.

Clever seam covering.  Lace, chiffon rosette trim, really old buttons from Gigi's sewing box.


Straps cut from the gathered top of the original apron, giving them a "poof" at the top of the shoulder!

back pockets!

back view, topstitching on gathered top of skirt

Front view, rosette trim at waist.  I think the gathering came out just right.


Finished back

Finished front

Front of bodice


Tuesday, May 8, 2012

A Letter to the Princessies!


Raina dictated this amazing "innation" to me.

And now we must "bring it to the mailbox, so then they get some money, get on the airplane, and come to SEEEE USSSSS!"  She is absolutely convinced that this is a foolproof plan.

If you mail it, they will come.

this is the envelope she decorated for them...

The front of the "innatation."  That's a picture of the party!

The back of the "innatation."  That's the princesses on the bottom.


That red line around the edge of the page?  That's the map from the castle to our house.

Obviously, I'm in love with this.  I try hard not to save every little scrap of paper she writes on, but oh. my. goodnes.  This one is a keeper.

Monday, May 7, 2012

Easy Gathered Top - Something for ME!

I made good on my promise to myself!  I did indeed make something for me this time around!

The shirt that matches the bias tape from yesterday's post....


Woohoo!

I made it using this pattern I bought on Etsy for a Simple Gathered Top.  This is such a quick and easy sew!  If I had used pre-made bias tape, I could have easily cranked this out in one night!  The variations and fabric possibilities are already swimming in my head!  I definitely recommend this pattern... and I think I might try out another 1 or 2 from the same shop!

So, the pictures...

the first two are of the shirt on me - while I'm standing on a toddler sized chair in front of my bathroom mirror in really poor lighting.  It's not easy to take a decent picture of yourself under those circumstances!  Still, there they are!  It's not as poofy as the second picture leads you to believe it is, I was just trying to keep my balance.


gathered neck...


flouncy bottom...


Very comfortable, and easy peasy to whip up.


I do think I made it too big, though.  I did the size 8 thinking I wanted it nice and roomy - but I'm going for the 6 next time.  I might lengthen it a bit, too.  This length is fine, but I have tiny people pulling at the bottom of my shirt most days, so a little length is never a bad thing.

And lastly, a tip.  Remember in my post about making the bias tape, I said that the most challenging part was converting cm to inches so that I'd know how long to make everything?  I was doing the same thing last night putting the finishing touches on this... and then hubby said, "Why not use cm side of your measuring tape?"

Oh.
Right.
Inches on one side, centimeters on the other.
Yeah.

Go have fun and make some shirts!