Pages

Showing posts with label dress. Show all posts

Friday, June 22, 2012

Sleeveless Tova Dress (for moi!)

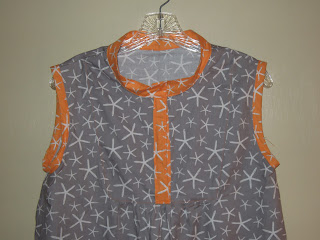
When I first decided it was time to sew something for myself, I did some serious interwebs research through my new favorite search engine:  Pinterest!  The pattern that kept popping up and catching my eye was the Tova!  I saw so many variations... like this one, and this one, and this one.  The price of the pattern deterred me at first, but I finally bought the PDF, and since I've already made one and cut a second, I think I'll get my money's worth!  While the variations are many, I finally decided that for my first Tova, I'd go sleeveless (allowing me to wear it right away!) and in a knee length dress length.  My fave summer outfit is a dress with leggins and sandals, so why not add some variety to my go-to outfit? 

The fabric is something I ordered a month or so ago, when I had just decided to make something for myself, but realized I had very little "grown up" fabric!  It's from Michael Miller's "Going Coastal" collection - sea stars in grey and orange.  I usually don't go for grey, or any neutrals for that matter, but this one appeals to me, and the orange coordinating fabric sets it off with just enough pop of color.  Also, it looks good with black leggings and orange sandals... both of which are already in my possession.


In some of the pictures, it looks like a real sack of a dress.  I was pretty nervous sewing it up that I was, indeed, sewing myself a very pretty sack.  But in the end, even my husband thought it was a really cute dress!  He's always the first to offer "constructive criticism" when it somes to my sewing and craft projects, so when the forst words out of his mouth are a compliment, I take it as a really good sign!!  I did end up taking it in a bit under the arms (this one is a medium, to compensate for my not so skinny hips and thighs), because while I am wide in the hip area, I do not have that same issue in the chest area! 

Other than that, I made 3 additional changes to the pattern.  The first, and most obvious - sleeveless!!  My original plan was to make the sleeves as in the pattern, but I also really wanted to wear the dress sometime soon!  And, uh, the print, being starfish and all, is a bit on the summery side to be long sleeved and intended for the fall.  To make it sleeveless, I simply made bias tape from the orange fabric and bound the unfinished armholes with it.  Incredibly easy, actually. 

Sleeveless!!

The second change, more for decoration than anything else, was to add vents at the bottom.  I didn't wan it to be tight at all around my knees.  I move and bend A LOT during the day to keep up with my kids, and having a dress that makes that difficult means that I just will not wear the dress, and that's a shame!  Additionally, I was looking for another place to add in some of the orange starfish.  It's extra from the bias tape I made to go around the sleeves, and took about 5 minutes to add on!


Third, and finally - I added a strip of the orange starfish to the insides of the front bodice where it opens.  I did this for a few reasons:  One, because it added more orange.  Two, because I think it looks more finished than seeing the underside of the grey printed fabric when the front is open (and when wearing, it usually IS open).  And third - when I sewed the edging onto the front and top-stitched, my machine did something wacky and made all kinds of extra loops in the underneath stitching.  This covers it, and allows me the opportunity to not seam rip to death the front of my otherwise lovely dress!


I like these changes, and think they made the dress much more wearable for ME.  Next time, I'm going to alter the collar - halving the width and rounding the corners, a-la this post.  (FYI, that link also takes you to an extremely helpful Tova sew-along.  Some awesome tricks and tips!)

(My collar, two ways)

closed, pulled straight, plackets lined up:


loose and open, and the way I'll likely be wearing it:


Also, I love me a dress with pockets.  I think the Tova dress could absolutely work with pockets... either slash pockets here:


or front patch pockets here:


You agree, yes?  Sometimes a Momma just needs a place to keep bandaids, cell phone, and a couple dollars from the iced coffee fund without lugging around a 25 pound diaper bag!  Obvi, the pockets would not be purple, or would at least be the same color purple... and would be appropriate sizes and all that :).

Here are some of my favorite details, in picture form:

(starting from large picture, then going clockwise)
1.  Bottom of front placket (placket!  that's the word I've been searching for this whole post!!)  Shows the orange stitching well, and the front pleat detail.
2.  Left sleeve, bound with handmade bias tape
3.  Inside front placket, lined with orange fabric
4.  Front placket
5.  Right sleeve
6.  Dress hem, two lines of orange contrast stitching

This was a pretty quick sew, despite my worries that it would be exactly the opposite with that front inset piece.  Omitting the sleeves, probably helped with that, but making the bias tape added time back on... so I'm probably pretty accurately even on time there.  I'm looking forward to making a bunch of these tops in different lengths and with different sleeve types.  The cut and fall of this shirt are absolutely my style, and I can see myself making loads of these.  If you make your own clothes, have thought about it, or like to have other people make clothes for you (my sister is guilty of this one!), then the Tova pattern should be in your home, and well loved.  Versatile, easy to wear, flattering.  Good things. 

I've already worn this one mutliple times... and I was actually frantically hand sewing my lining on the placket the morning of the first time I wore it!  I just couldn't wait to put it on.  And some day, really, I'll get my act together enough to actually iron a piece of clothing before I photograph it and blog about it!  :)  I'm probably embarrassing my mother with all of these rumpled pictures.

rumpled hem!

rumpled collar!
If you're on Pinterest (and if you aren't, why aren't you?!), type "Tova" into the search box and you'll get all kinds of results.  So many ideas for fabric choices and alterations.  Can't wait to see what my next one looks like!

finished Tova, and my mom's door :)  hooray!

Monday, June 4, 2012

2 new dresses for Raina

Clever title, I know.


I refashioned two shirts for Raina.  She's majorly in to dresses right now, and has to have one layered on top of whatEVER else she is wearing.  Her typical daily outfit consists of: a mismatched pair of socks, leggings, fancy shirt (undershirt), t-shirt, dress.  She would love to add a bathing suit to this ensemble, but we don't have enough of them to keep her outfitted in one every day :)

We got a bunch of hand-me-downs recently, which included these two beautiful shirts:


I am almost too in love with the one on the left:


Where can I find fabric that looks like this that is not already a shirt?


Sadly, they qualify as neither fancy shirt nor dress.   Every time I try to convince Raina she wants to wear one, or just casually leave them on the top of the shirt pile in her dresser, she tosses the aside and declares, "That is NOT a dress!  Sorry!"

I fixed that!  Now they are both dresses!  Incredibly easy ones, too.


The purple floral one, which began it's life as a Gap floaty tank that I would love to have in my size, joined forces with a fat quarter of purple fairy fabric.  Just a simple circle of fabric, gathered a little and sewn to the bottom.


I love some of the details on the original shirt - like the buttons and the straps.  I've made a mental note to add braided straps to an upcoming project.  So cute.


The second shirt, which has some gorgeous frog closures and trim decorating the bodice, met some ruffle fabric.  (Yeah, I don't like the way it photographed, either.  That's why there is only one picture of it as a finished dress as opposed to 12 of the purple one.  This was the only one acceptable enough to share.  disappointing.)


It's cuter than it looks.  I just could not get the ruffle fabric to hang right for pictures.  Maybe on a for reals person it will show better.  Ruffle fabric is amazing in that it doesn't even need to be hemmed.  Cut a length, sew it in a circle, sew to bottom of shirt.  Wowzah.  It doesn't really taper inward.  It's straight, and it's really cute in real life.

And now, hopefully, they will get some attention and not the cold shoulder!

Also, I'm realizing that Raina has a lot of dresses, and I'm just adding to the madness.  I should hold back, but it's just so darn fun to sew colorful sort-of-matching-fabrics dresses for a 3 year old who loves to wear them.  I think I have a problem.

Saturday, May 12, 2012

Gigi Dresses Part 2: Lucca's Dress

(the pictures in this post are wacky.  my tall lamp broke, and pictures without my tall lamp friend mean bad lighting.  I tried to move into the bathroom, but things weren't much better in there.  pictures on model will come soon and will hopefully be in better lighting!)

Making these dresses has been an emotional process for me.  Taking her things, well worn, soft from washings upon washings, and making them into new little things for my own littles... it's given me time to think about her.  I'd sit at my sewing table, pinning, cutting, trimming, my fingers running along the bindings and over the buttons, and my mind would have a chance to wander and remember - something it doesn't get to do often enough in the hubbub of my everyday life.  I think she'd like these dresses.  (See Raina's dress here)


This one, for my chubby little 6 month old love, is made from the pink rose print apron.


I made it using the Goldie dress pattern... with adjustments of course, to account for the fact that my fabric was not a flat rectangle... but was instead an apron with snaps and pockets and a pretty finished edge.  

I had some snafus with this projects.  I don't know where I went wrong.  Obviously, my mind wandering got the better of me a few times, and this isn't a dress I'll be showing many people the inside of!  :)


I noticed at this stage in my sewing that a couple things had happened.  The bodice and skirt were well constructed, but sewn together wrong.  So I ended up with pockets in the back, and a seam down the front of the bodice.  Le sigh.  I did find a cute fix for the seam, and Lucca doesn't really need front pockets... so it I used it as a learning experience, but didn't spend any time with my seam ripper.


And for the first time, a HAMMER made an appearance at my sewing table!  Oh SNAP!  I've been favoring the button and loop lately, but for Miss Lucca, snaps seemed like a better choice... and it was fun to bust out the hammer.


THe snappage, however, did not go quite as planned.  Due to my previously mentioned inside out and backwards bodice, there were original snaps in my way when I went to attach the new snaps.  The yop ended up being slightly uneven, despite my best efforts to adjust things.  See the funny insides?  Extra crazy snaps.


When all was said and done, the finished dress was adorable.  I love the details on the outside, even if teh details on the inside are imperfect.

Clever seam covering.  Lace, chiffon rosette trim, really old buttons from Gigi's sewing box.


Straps cut from the gathered top of the original apron, giving them a "poof" at the top of the shoulder!

back pockets!

back view, topstitching on gathered top of skirt

Front view, rosette trim at waist.  I think the gathering came out just right.


Finished back

Finished front

Front of bodice


Tuesday, April 24, 2012

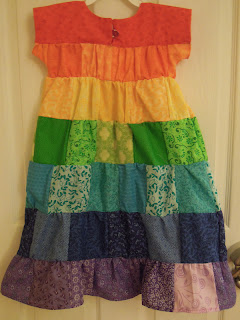
Raina's Rainbow Dress (gown?)


I've been dreaming of this one for a while now.  I made it in a 3T instead of my usual 2T for Raina because I want it to fit for a while... and, uh, I guess I succeeded!  My first thought when she tried it on was along the lines of, "Wow!  Toddler rainbow mumu!  Awesome!"  But she can totally pull it off.  Especially out in public, topped with her dino hoodie!

This is the pile of fabric that inspired me to get started:


I Started with the Oliver & S Ice Cream dress pattern that I used a few weeks ago.  I used that to make the top (red piece) of the dress, and then I used the rest of the pattern pieces to create a basic shape for the bottom.  I divided the bottom into sections, and then started cutting!


I really just went with it on this part.  I didn't measure the squares at all, and didn't iron the fabric.  Bad seamstress Mommy.  But since they were going to be gathered and cut in the end anyway, it didn't seem like a big deal.  And really, it wasn't.  Honestly, I used the fold lines on the fat quarters as my cutting lines!  They ended up being basically uniform, with just a few pieces straying from the norm.  I ended up with rainbow patchwork rows:

I sewed the top of each with a basting stitch, gathered it, and started sewing them together from purple up to orange, making sure each row was slightly smaller in circumference than the one before.  When I got to orange, I gathered it to the measurement of the bodice top, and resumed following the Ice Cream Dress pattern to sew it together.  The bottom was hemmed last, with what seemed like 100 yards of pink thread!  :)


I love that it still has the v notch in the neckline...


but I ended up scrapping the bottom piece of the original pattern and just hemming a row of squares.  It's not as heavy this way, allowing more twirl factor.  Which, if you have a 3 year old girl, you know is supremely important!


The button loop is sewn from a different piece of red fabric, and the button itself is a simple shiny red little thing.


Rainbow dresses are good for lots of things!
Getting into your paint...


Snuggling your little sister...
 

Playing with your little sister...


Dressing tiny princesses...


and even putting tiny princesses in their beds!


Rainbow dresses are also good for dancing in puddles, layering with all the striped clothing in your wardrobe, playing rainbow snail (wish I had pictures of this!), and eating quesadillas.  They are not good for napping, though.  You must change back into your princess nightgown for that!


Go forth!  Sew yourself a rainbow and dance!