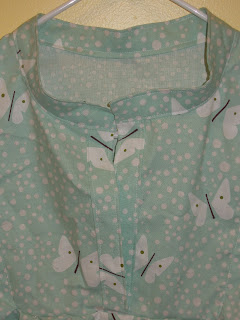
In case you didn't get it, that title is supposed to be chanting like you're egging on a toga party :).
The Tova pattern, previously seen in my starfish dress, is my new favorite favorite. Basically, I'm going to make 5 or 6 of them and call my fall wardrobe complete! :) Kidding. Sorta. Or not. :)
This time around, I made the sleeves, and used the regular shirt length instead of dress length. It's still awesomesauce.
As we already know, I'm a big fan of using fabric that was possibly intended for children to make my own clothing. I've got a dress cut for Lucca in the same fabric, and while I love it for her tiny size, I"m going to be honest here and admit that I definitely bought it with the Tova pattern in mind!
I'm pretty much in love with it, from the gathered cuffs, to the front bodice, to the slightly poofed shoulders...
Time to start cutting the next one! And if you're looking for a preview.... NEXT TIME, on Tova party 2012: un-gathered cuffs, side seam pockets (!), narrower rounded corner collar. Are you ready for the excitement?!
Showing posts with label sewing for me. Show all posts
Showing posts with label sewing for me. Show all posts
Thursday, August 2, 2012
Friday, June 22, 2012
Sleeveless Tova Dress (for moi!)
When I first decided it was time to sew something for myself, I did some serious interwebs research through my new favorite search engine: Pinterest! The pattern that kept popping up and catching my eye was the Tova! I saw so many variations... like this one, and this one, and this one. The price of the pattern deterred me at first, but I finally bought the PDF, and since I've already made one and cut a second, I think I'll get my money's worth! While the variations are many, I finally decided that for my first Tova, I'd go sleeveless (allowing me to wear it right away!) and in a knee length dress length. My fave summer outfit is a dress with leggins and sandals, so why not add some variety to my go-to outfit?
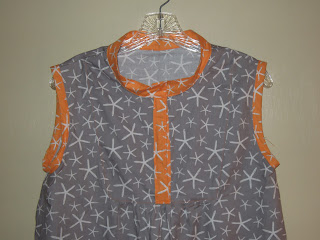
The fabric is something I ordered a month or so ago, when I had just decided to make something for myself, but realized I had very little "grown up" fabric! It's from Michael Miller's "Going Coastal" collection - sea stars in grey and orange. I usually don't go for grey, or any neutrals for that matter, but this one appeals to me, and the orange coordinating fabric sets it off with just enough pop of color. Also, it looks good with black leggings and orange sandals... both of which are already in my possession.
In some of the pictures, it looks like a real sack of a dress. I was pretty nervous sewing it up that I was, indeed, sewing myself a very pretty sack. But in the end, even my husband thought it was a really cute dress! He's always the first to offer "constructive criticism" when it somes to my sewing and craft projects, so when the forst words out of his mouth are a compliment, I take it as a really good sign!! I did end up taking it in a bit under the arms (this one is a medium, to compensate for my not so skinny hips and thighs), because while I am wide in the hip area, I do not have that same issue in the chest area!
Other than that, I made 3 additional changes to the pattern. The first, and most obvious - sleeveless!! My original plan was to make the sleeves as in the pattern, but I also really wanted to wear the dress sometime soon! And, uh, the print, being starfish and all, is a bit on the summery side to be long sleeved and intended for the fall. To make it sleeveless, I simply made bias tape from the orange fabric and bound the unfinished armholes with it. Incredibly easy, actually.
The second change, more for decoration than anything else, was to add vents at the bottom. I didn't wan it to be tight at all around my knees. I move and bend A LOT during the day to keep up with my kids, and having a dress that makes that difficult means that I just will not wear the dress, and that's a shame! Additionally, I was looking for another place to add in some of the orange starfish. It's extra from the bias tape I made to go around the sleeves, and took about 5 minutes to add on!
Third, and finally - I added a strip of the orange starfish to the insides of the front bodice where it opens. I did this for a few reasons: One, because it added more orange. Two, because I think it looks more finished than seeing the underside of the grey printed fabric when the front is open (and when wearing, it usually IS open). And third - when I sewed the edging onto the front and top-stitched, my machine did something wacky and made all kinds of extra loops in the underneath stitching. This covers it, and allows me the opportunity to not seam rip to death the front of my otherwise lovely dress!
I like these changes, and think they made the dress much more wearable for ME. Next time, I'm going to alter the collar - halving the width and rounding the corners, a-la this post. (FYI, that link also takes you to an extremely helpful Tova sew-along. Some awesome tricks and tips!)
(My collar, two ways)
Also, I love me a dress with pockets. I think the Tova dress could absolutely work with pockets... either slash pockets here:
or front patch pockets here:
You agree, yes? Sometimes a Momma just needs a place to keep bandaids, cell phone, and a couple dollars from the iced coffee fund without lugging around a 25 pound diaper bag! Obvi, the pockets would not be purple, or would at least be the same color purple... and would be appropriate sizes and all that :).
Here are some of my favorite details, in picture form:
(starting from large picture, then going clockwise)
1. Bottom of front placket (placket! that's the word I've been searching for this whole post!!) Shows the orange stitching well, and the front pleat detail.
2. Left sleeve, bound with handmade bias tape
3. Inside front placket, lined with orange fabric
4. Front placket
5. Right sleeve
6. Dress hem, two lines of orange contrast stitching
This was a pretty quick sew, despite my worries that it would be exactly the opposite with that front inset piece. Omitting the sleeves, probably helped with that, but making the bias tape added time back on... so I'm probably pretty accurately even on time there. I'm looking forward to making a bunch of these tops in different lengths and with different sleeve types. The cut and fall of this shirt are absolutely my style, and I can see myself making loads of these. If you make your own clothes, have thought about it, or like to have other people make clothes for you (my sister is guilty of this one!), then the Tova pattern should be in your home, and well loved. Versatile, easy to wear, flattering. Good things.
I've already worn this one mutliple times... and I was actually frantically hand sewing my lining on the placket the morning of the first time I wore it! I just couldn't wait to put it on. And some day, really, I'll get my act together enough to actually iron a piece of clothing before I photograph it and blog about it! :) I'm probably embarrassing my mother with all of these rumpled pictures.
If you're on Pinterest (and if you aren't, why aren't you?!), type "Tova" into the search box and you'll get all kinds of results. So many ideas for fabric choices and alterations. Can't wait to see what my next one looks like!
The fabric is something I ordered a month or so ago, when I had just decided to make something for myself, but realized I had very little "grown up" fabric! It's from Michael Miller's "Going Coastal" collection - sea stars in grey and orange. I usually don't go for grey, or any neutrals for that matter, but this one appeals to me, and the orange coordinating fabric sets it off with just enough pop of color. Also, it looks good with black leggings and orange sandals... both of which are already in my possession.
In some of the pictures, it looks like a real sack of a dress. I was pretty nervous sewing it up that I was, indeed, sewing myself a very pretty sack. But in the end, even my husband thought it was a really cute dress! He's always the first to offer "constructive criticism" when it somes to my sewing and craft projects, so when the forst words out of his mouth are a compliment, I take it as a really good sign!! I did end up taking it in a bit under the arms (this one is a medium, to compensate for my not so skinny hips and thighs), because while I am wide in the hip area, I do not have that same issue in the chest area!
Other than that, I made 3 additional changes to the pattern. The first, and most obvious - sleeveless!! My original plan was to make the sleeves as in the pattern, but I also really wanted to wear the dress sometime soon! And, uh, the print, being starfish and all, is a bit on the summery side to be long sleeved and intended for the fall. To make it sleeveless, I simply made bias tape from the orange fabric and bound the unfinished armholes with it. Incredibly easy, actually.
 |
| Sleeveless!! |
The second change, more for decoration than anything else, was to add vents at the bottom. I didn't wan it to be tight at all around my knees. I move and bend A LOT during the day to keep up with my kids, and having a dress that makes that difficult means that I just will not wear the dress, and that's a shame! Additionally, I was looking for another place to add in some of the orange starfish. It's extra from the bias tape I made to go around the sleeves, and took about 5 minutes to add on!
Third, and finally - I added a strip of the orange starfish to the insides of the front bodice where it opens. I did this for a few reasons: One, because it added more orange. Two, because I think it looks more finished than seeing the underside of the grey printed fabric when the front is open (and when wearing, it usually IS open). And third - when I sewed the edging onto the front and top-stitched, my machine did something wacky and made all kinds of extra loops in the underneath stitching. This covers it, and allows me the opportunity to not seam rip to death the front of my otherwise lovely dress!
I like these changes, and think they made the dress much more wearable for ME. Next time, I'm going to alter the collar - halving the width and rounding the corners, a-la this post. (FYI, that link also takes you to an extremely helpful Tova sew-along. Some awesome tricks and tips!)
(My collar, two ways)
closed, pulled straight, plackets lined up:
loose and open, and the way I'll likely be wearing it:
Also, I love me a dress with pockets. I think the Tova dress could absolutely work with pockets... either slash pockets here:
or front patch pockets here:
You agree, yes? Sometimes a Momma just needs a place to keep bandaids, cell phone, and a couple dollars from the iced coffee fund without lugging around a 25 pound diaper bag! Obvi, the pockets would not be purple, or would at least be the same color purple... and would be appropriate sizes and all that :).
Here are some of my favorite details, in picture form:
(starting from large picture, then going clockwise)
1. Bottom of front placket (placket! that's the word I've been searching for this whole post!!) Shows the orange stitching well, and the front pleat detail.
2. Left sleeve, bound with handmade bias tape
3. Inside front placket, lined with orange fabric
4. Front placket
5. Right sleeve
6. Dress hem, two lines of orange contrast stitching
This was a pretty quick sew, despite my worries that it would be exactly the opposite with that front inset piece. Omitting the sleeves, probably helped with that, but making the bias tape added time back on... so I'm probably pretty accurately even on time there. I'm looking forward to making a bunch of these tops in different lengths and with different sleeve types. The cut and fall of this shirt are absolutely my style, and I can see myself making loads of these. If you make your own clothes, have thought about it, or like to have other people make clothes for you (my sister is guilty of this one!), then the Tova pattern should be in your home, and well loved. Versatile, easy to wear, flattering. Good things.
I've already worn this one mutliple times... and I was actually frantically hand sewing my lining on the placket the morning of the first time I wore it! I just couldn't wait to put it on. And some day, really, I'll get my act together enough to actually iron a piece of clothing before I photograph it and blog about it! :) I'm probably embarrassing my mother with all of these rumpled pictures.
 |
| rumpled hem! |
 |
| rumpled collar! |
finished Tova, and my mom's door :) hooray!
Wednesday, June 13, 2012
Strawberry Pickin' Summer Blouse
I made another top for myself! I used the Summer Blouse pattern again, only this time I lost the sleeves. I really thought that challenging myself to sew things for my own wardrobe would be a struggle, since I love sewing for kids so much. Turns out I love sewing for myself! Now I need to opposite-challenge myself to start sewing kids clothes again! :) Or maybe I should challenge myself to work harder on my baby clothes quilts!!
Here's the front:
And here's the back!
This top is the much anticipated (ha! By me anyway...) companion piece to Raina and Lucca's Gigi dresses - made from my sweet grandmother's old aprons. Once again, I stuck to the pattern as much as possible, but basically just cut iff the bottom of the apron and used that as the bottom piece to keep pockets, buttons, and trims intact.
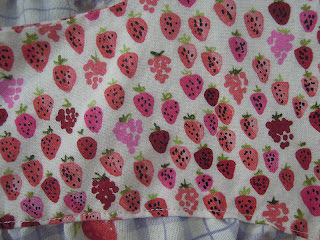
From the beginning, I knew that I'd use this strawberry print apron to make something for myself. I love it - print, softness, color, everything about it. I knew I needed to use a fun pattern to coordinate with it for the bodice top, and as soon as I saw this strawberry print I fell in love.
It's strawberries and raspberries in pinks and reds, and has kind of hand-printed look to it.
I was concerned for just a second or two that it was TOO MUCH STRAWBERRY. It didn't last long, and I'm glad I didn't let the little voices sway me. Love.
No buttons on this one, and no poofy sleeves. Simple summer tank, perfect for picking strawberries. Which I plan on doing with my lovely little ladies as soon as the stinkin' rain stops!!
Tuesday, May 29, 2012
Treasure Pockets for ME!
I'm really on a roll with this sewing for me thing! This time, not only was I able to make something fun I can wear this summer... I also saved a pair of pants from the pile of doom in my closet known as "these used to fit me, and they're too pretty to get rid of." It's a sad sad pile.
BUT... I had a lightbulb! Raina's little treasure pocket pants are so cute (yep, they became Raina's... from the 12 month pattern size!). And that bird fabric, LOVE. So why not adapt it a little, and make it for me?
I started with pair of magenta-purple-ish linen pants from Old Navy. The tag says they are a 2, and that little number is laughing at me. I didn't cut it, but I wanted to. It's nice to have it there though, reminding my 4 sizes larger self where my butt used to fit! Babies. They are so worth the bigger clothes.
I took the side pocket panel pattern pieces (that's a mouthful!!) from Raina's pants, and made them longer. I used the same width and pocket size from the 12 month pattern, pinky swear! I didn't need a SUPER wide panel, just wide enough to accommodate some leftover morning sickness-subsiding bagel baggage. I sewed them together just like the pattern says, and then attached to to my wide open pants... just like the pattern says.
I made it really easy for myself and used the bottom edge of the sheet (that's what the bird fabric is from, if you haven't read the other couple posts where I've used it :)! ) No hemming, and easy to line up with the existing finished bottom of the pants. I suppose if I hadn't been using a fabric with a finished edge, I would have pre-hemmed the pocket panel before sewing it to the pants.
They needed a little tweaking at the waist when I was done, since the width of the panels actually made them *TOO BIG*! I love saying that. I took them in a little, just curving my inside seams and then finishing them with a zig-zag stitch.
Purty! Raina is pretty amused that we have matching pants now :) I am, too, actually! And I love that I got to use this bird fabric for something I can wear! I'll try to get a decent picture of them on me to post, but I'm usually the one behind the camera, so we'll see how that goes.
I have a couple more pants awaiting this treatment right now... and I'm resisting the urge to match the panels to the tops I'm making. I love the fabrics, but the matchy-matchy-ness of it creeps me out a little.
Monday, May 28, 2012
Pretty Summer Blouse
The newest chapter in the "sew something for myself!" series! See, I told you I've actually been doing some sewing, not just writing tearjerkers. :)
Honestly, though, I've been working on this one for quite a while. It's an easy pattern, but I had so much going on, and it just kept getting hung over the back of my chair and then inevitably something would get hung over it and I'd forget for a few days. Oh, did I mention it's also a FREE pattern? THat comes in multiple sizes? For really real! You can download it here: Pretty Blouse pattern For free!
Did I mention it's free.
Okay, I'm over it now.
As I was sewing, it seemed like I was making a tent. So. Much. Fabric! I kept having to remind myself that yes, sewing mommy's clothes uses more fabric than sewing toddler and baby clothes, and it was going to be okay. Even when I was almost done, I held it up and thought, "What the heck kind of a mumu is this?! Why did I waste my pinwheels on this?!"
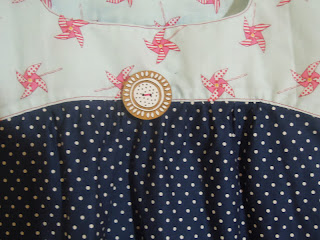
But in the end. I love it. Even more so with the addition of the button. It's wooden, with white paint. I wish I could tell you it's vintage, or that I salvaged it from an amazing thrift store, but I bought it at JoAnn's.
At times I questioned the use of the pinwheels. It's really a kids fabric. I mean, the line is called "Children at Play." But I love it so much!! And I think the navy with white polka dots really works with it. Not too busy, and the dots make it more grown up. Or it's possible that since I spend pretty much all of my time around children, I am absorbing their dress code. I can live with that.
 |
| so you can really see the pinwheels, and also the pretty neckline. |
A few years ago, before Raina was born, I was with a group of church friends. I had gone to join them straight from work as a preschool teacher, so I was dressed for the occasion, but I don't think my outfit was anything I would have thought twice about wearing on a non-work day actually. One of them said to me, "I wish I had the courage to dress like you."
Uh... thanks? I decided to take it as a compliment. I felt confident and happy wearing a pink jersey dress over a button up shirt, with jeans and purple converse at the ripe old age of 27. I still think back on that comment fondly, and try to dress in a way that people wish they had the courage to emulate. (Not always easy with this post 2 baby bod, but I'll be back in top form some day...) (And also, did I just use the word fondly? Maybe I'm older than I thought!)
Any way, here's a few extra pictures...
I'm working on a second one already, minus the poof sleeves. (Spoiler Alert! It's a companion piece to Lucca and Raina's Gigi dresses!!)
Monday, May 7, 2012
Easy Gathered Top - Something for ME!
I made good on my promise to myself! I did indeed make something for me this time around!
The shirt that matches the bias tape from yesterday's post....
The shirt that matches the bias tape from yesterday's post....
Woohoo!
I made it using this pattern I bought on Etsy for a Simple Gathered Top. This is such a quick and easy sew! If I had used pre-made bias tape, I could have easily cranked this out in one night! The variations and fabric possibilities are already swimming in my head! I definitely recommend this pattern... and I think I might try out another 1 or 2 from the same shop!
So, the pictures...
the first two are of the shirt on me - while I'm standing on a toddler sized chair in front of my bathroom mirror in really poor lighting. It's not easy to take a decent picture of yourself under those circumstances! Still, there they are! It's not as poofy as the second picture leads you to believe it is, I was just trying to keep my balance.
gathered neck...
flouncy bottom...
Very comfortable, and easy peasy to whip up.
I do think I made it too big, though. I did the size 8 thinking I wanted it nice and roomy - but I'm going for the 6 next time. I might lengthen it a bit, too. This length is fine, but I have tiny people pulling at the bottom of my shirt most days, so a little length is never a bad thing.
And lastly, a tip. Remember in my post about making the bias tape, I said that the most challenging part was converting cm to inches so that I'd know how long to make everything? I was doing the same thing last night putting the finishing touches on this... and then hubby said, "Why not use cm side of your measuring tape?"
Oh.
Right.
Inches on one side, centimeters on the other.
Yeah.
Go have fun and make some shirts!
Subscribe to:
Posts (Atom)


