I haven't been here in ages. I always feel like before I start posting I need to catch you all up on what I've done with my life since I last posted, a task that seems too big to get to. So I'm throwing that idea aside and just saying, "HI!" You'll figure out what's been going on as I post - hopefully more frequently again!
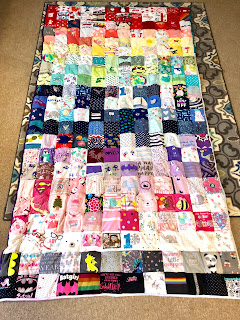
During my steady posting days a few years back I was working on baby clothes quilts for my girls. Guess what? They still aren't done! I also started cutting squares for my son's quilt. Also not complete. But I have a cutie pants little niece now, Eliza. She's almost 2 and she's taught me how much fun it is to be an auntie! Her quilt? Finished, done, gave it to my sister for Christmas. Sorry kids, hahaha!
It was almost easier to work on a quilt I'm not *as* emotionally invested in... although there were plenty of squares that cam from outfits my own daughters wore before we passed them down to Miss Eliza! I planned this quilt a lot more than any previous quilting projected - counted square and rows, chose a size ahead of time (WHAT?!), worked on a color scheme (RAINBOWS!)... and it all came together magically.
Magically last minute. As in, finished the morning it needed to be given. On Christmas Eve day. So long, all other projects and items on my to-do list! I am *so* glad I was able to give such a meaningful gift to my sister this year - one I hope she treasures for ever and looks at often. Those baby days don't last nearly as long as you thin they will....
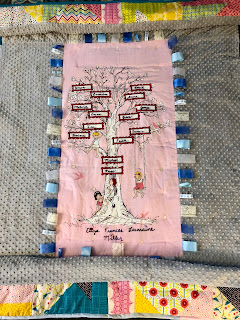
I'm pretty obsessed with the details. The back is an embroidered family tree, just like Raina and Lucca have (I really would love to find a different colored version for Finn's!). I keep saying I'm not really a pro at embroidery, but I've done an awful lot of it now! I embroidered all the names in purple, and used buttons for embellishment. The mother of pearl buttons are part of the quilting front to back, and came from my grandmother's sewing box. The ribbons around the edge of the family tree are sewn in tagged blanket style, and are from a decoration my sister and I made to decorate Eliza's high chair during her first birthday party!
Around the family tree I used a pretty neutral silvery grey milky dot - so soft and really not terrible to work with. The brightly colored bands on the top and bottom of the back are from her playmat - that baby holder with the big arches and dangly toys.
I had so much fun cutting squares for the front. There are onesies, dresses, pants, overalls, sweaters, hats, bibs, blankets... a little bit of everything. Wherever possible I saved pockets, ruffles, zippers, bows.... details add so much.
Previous to finishing this quilt, I thought binding a quilt was super complicated. Turns out... I'VE BEEN DOING IT WRONG. Yep. I read a few tutorials, watched a Youtube video... and turns out it's not nearly as much trouble as I thought (and had previously put myself through!). I machine sewed the front and hand sewed the back. The entire way around. I thought I was going to be binding this quilt for-actual-ever. The light blue and light pink sections of binding were (again) from my grandmother's sewing box.
It was a true labor of love. I'm glad I finished but honestly... so looking forward to getting my own kids' quilts worked on like crazy in 2018! <3 p="">
Friday, December 29, 2017
Tuesday, March 11, 2014
DIY baby carrier cover
It started like any other time they let me loose in Gymboree unsupervised: I had an armful of things I didn't really need to buy in no time at all. One of the things in my pile was this awesomely-awesome mustache print hoodie:
But… ummm… it was a size 10/12. And my kids are just barely 5, 2, and 7 months. So yeah. But I couldn't find it smaller, and it was on clearance. So what's a crafty momma to do? Bring home that $8 mustache print deal and turn it into something new!! This one was born out of necessity. We're just outside of Boston, and it stays chilly here for way too long. Mr. Baby Man gets chilly when he's up riding around in whatever wrap or carrier we've chosen for the day, and he needed a way to stay warm!
I found this carrier cover on the interwebs a while back, but every time I looked at it all i could hear in my head was, "I COULD MAKE THAT!" (I have "I CAN MAKE THAT!" disease)
COLD BABY IS COLD!
I found this carrier cover on the interwebs a while back, but every time I looked at it all i could hear in my head was, "I COULD MAKE THAT!" (I have "I CAN MAKE THAT!" disease)
First things first, i cut off the sleeves. Just over the seams, so that what is left is all raw edge.
Then I turned it inside out...
pinned the opening closed...
And sewed it up, rounding off the corners. Just for fun.
right side out! And the corners don't look rounded at all! Haha. I think I took the picture below and then decided to go back in and round the corners. But didn't retake the picture for the next step. Tutorial fail. Use your imagination.
Then I turned it inside out again and sewed across the bottom, right over the end of the zipper. Now, I considered cutting off this bottom ribbed portion. I didn't, and there are a few reasons why. First of all, while it is slightly too long for baby guy right now, he will, in fact, grow longer. And this is too awesome to outgrow. Also, POCKETS. I wanted to keep the pockets intact. Cutting off the bottom would have compromised the already wonderfully sewn in pockets, and losing them would have made me a sad panda. When we are playing outside, the big girls ask for help. A lot. Which means my mttiens/gloves/assorted finger coverings are constantly on and off. And some times I just don't put them back on. Now I have a place to keep my cold hands in between snow pant adjusting, shovel finding, nose wiping, and all that other fun stuff.
So now the main part of the cover is complete. You could finagle it to work like this maybe. But it gets better!
I took the sleeves and cut off the top unfinished portion. Why did I take this picture with the measuring tape? To show you how much to cut off. Did I do it in a helpful way? Nope, just kinda threw the measuring tape on there. Looks like I made them 4.5" - 5" wide though, based on the next picture's mustache placement :)
Now i needed to know where to sew them on for actual usefulness purposes. But my baby was long asleep. And it was way too late. Maybe there was wine involved. So I wrapped up a piece of fabric. Here I am with my minky baby.
So cute.
He was a good model!
And I kept him on for way too long.
Right. So after you've got placement marked for your preferred carrier straps, you can make the aforementioned straps.
I folded mine in half, right sides together, pinned, and sewed.
NOW. Because of how i cut off the top of the sleeve, I ended up with angled pieces. COmpletely unintentional, but it really worked for this project. Win! However, not necessary. If you would rather make them straight (from the sleeve or from other fabric), that will work just as well.
Then fold in the open edges of the straps and stitch them closed. I did not take close up pictures of this step. Sorry and oops.
Day two, checking placement with real baby!
Once i had double checked, i pinned the strap to the body of the cover, and pinned velcro on the ends of the straps.
Here are both sides all pinned up:
And how they would look closed:
Next step: Sew on the velcro pieces, and sew the center of the strap onto the cover. I sewed in a box, and went over it twice. You can do an x-box if you'd prefer, but this won't be weight bearing, just covering, so it didn't seem necessary.
All done!
I was almost done here. But the hood was awfully large in practice and I wanted to do something about that. It was, after all, made for a head much larger than the one i intended for it to cover! So i folded the edge in 1" all the way around, pinned, and sewed, leaving it open on the ends. That part is important! We'll be inserting a drawstring, so there must be a place for the string to be drawn! :)
Tada!
I used this because I had it. If I had had black i would have used it. I still might switch it out. But most of the time that seems like a lot of work.
Attached a large safety pin to one end...
Inserted it in to one end...
and threaded through the channel around the hood.
Success!
It pulls much tighter and smaller now, and is a perfect fit for baby guy's head.
I threaded a toggle through on each end to keep it in place and to help in tightening. Again, I used these ones because I had them. Not my first choice aesthetically, but it works.
And then we tested it while playing out in the snow with the big sisters!!! Love it!!!
I unzip the front almost all the way down, leaving it zipped a duple inches to leave a pocket for his feet, slide in the feet, pull it up over and around, attach the velcro loops around my straps (I've used it on a WCMT, Tula, and a wrap. If you don't know what those mean and you are just here because I finally posted again after a 2 year hiatus, sorry. :) Happy to decipher in comments!). and cinch up the hood. I've found that when I'm not using the hood on him, it is also a useful place to keep my phone :)
Questions? Happy to answer any and all! I love comments. Unless they're mean. Then I delete them.
Should I do more baby wearing related DIY posts? I feel like the direction of this blog has changed constantly over the years as my life has. Maybe this is a new topic for me here.
Also, personal plug… links to my old easy shop appear throughout my previous posts. It is gone, but there is a new shop! With SO many goodies! www.sunshinesthree.etsy.com Visit!
Subscribe to:
Comments (Atom)


